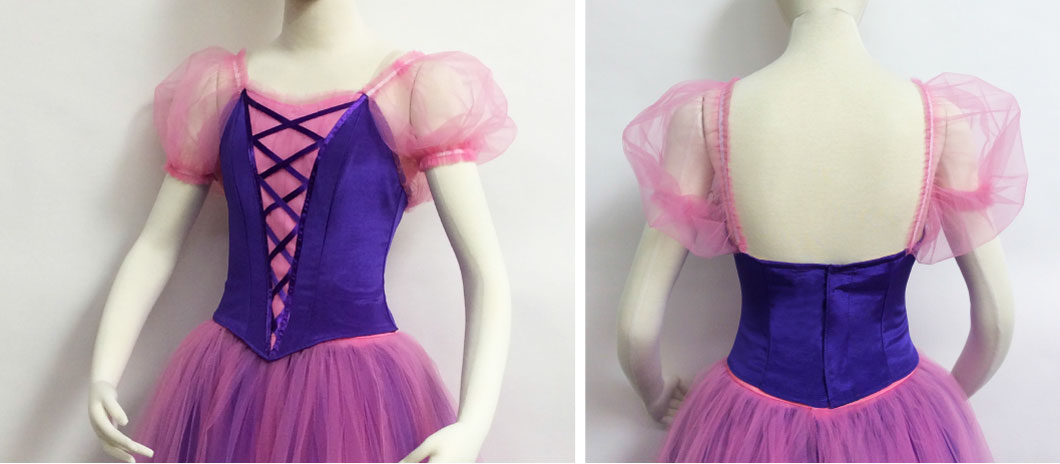
How to Make A Character Bodice with Attached Tulle Puffed Sleeves

What you will need: A bodice to use as your base, a piece of a contrasting color fabric for the center, 1/4" ribbon for trim, 1 Tulle Square, ruler, scissors, a piece of paper to make a pattern, tailors chalk or disappearing pen for marking, 4 pieces of 1/4" elastic 18" long, a loop turner or safety pin for feeding elastic thru puff sleeve.
Place the paper under the bodice and trace the neckline marking the center front and strap elastics, remove paper and draw a straight line down the length of the center bodice. Draw a shaped line for the inset shape. Add 1/2" seam allowance around all edges. Draw out the desired ribbon lacing pattern.
Using the pattern cut out the inset shape in your contrasting fabric. Randomly pleat a double layer of tulle over the inset and pin in place - it does not have to be perfect.

Stitch down at 1/2" around the inset and then trim away excess tulle. Using your pattern as a guide place the ribbon lacing in place and pin. Stitch down sides, trim excess ribbon and then fold down top edge at the 1/2" line and stitch down creating a 1/2" frill on the top edge. Using more of the ribbon stitch down sides to create a finished edge. Stitch finished applique down on the bodice.
Measure the distance between the strap elastic in the front and where attached in the back. Place Tulle Square with folded edge towards you and fold over from left to right. Measure straight up approx. 14" then draw a line, measure up 1/2 the distance calculated from the bodice (12" divided in 2 = 6"). Mark the sleeve width at 12" at the edge, 8" at the 14" mark and 4" at the end. Draw a shaped line up to connect these marks. Note- this does not have to be perfect, just a soft curve
Cut out sleeves and cut notch in one side at 14" mark. With leftover tulle mark and cut 2 strips 1" wide up length of tulle (these will be the elastic casings). Open up each double layer sleeve and place the first piece of elastic casing on the edge with the notch.
Stitch the casing down from notch to notch at 1/2" from edge (this creates an edge frill). Stitch a second line approx. 1/4" from first line (this creates the casing for your elastic). Repeat same stitches on the bottom edge beginning and ending 1/2" from the end. 
Feed elastics thru the casings on either side of sleeves. Fold sleeve in half and close the side lifting away the elastic so not to included in seam.
Turn sleeve right side out and pull elastic on bottom edge and tie at desired tightness. Place sleeve, matching seam with side seam on bodice and pin, continue pinning sleeve along edge from shoulder elastic front to back. If sleeve is slightly big just pleat to fit.
Stitch down sleeve, lifting away sleeve elastic so not to catch in seam on the back side but stitching thru the sleeve elastic at the front. This will secure the sleeve elastic in the front and allow the sleeve elastic to be adjusted and pulled into place in the back once on the dancer.

